Getting Started
Dynamix is an automated Solana trading control dashboard. It monitors PumpFun and PumpSwap markets in real time, executes buy and sell orders based on your configured rules, and provides a complete management interface for wallets, trading parameters, exit strategies, and transaction history.
Quick Start in 3 Steps
Purchase a Plan
Choose Monthly or Yearly, enter your email, and pay with SOL. Your API key will be emailed to you.
Sign In & Set Up Wallets
Use your API key to sign in. Generate a new wallet or import an existing one, then fund it with SOL.
Configure & Trade
Set your entry mode, exit points, and transaction settings. Hit Start and Dynamix trades automatically 24/7.
Purchase a Plan
Dynamix offers a single full-access tier with no feature gates. Choose between Monthly and Yearly billing.
| Plan | Price | Savings |
|---|---|---|
| Monthly | $1,000 / month | — |
| Yearly | $6,000 / year | Save $6,000 (50%) |
How the Purchase Flow Works
Select Your Plan
Navigate to the pricing page and choose Monthly or Yearly. Both plans include every feature.
Enter Your Email
Provide the email address where your API key will be delivered. If you already have an active key, you'll see an option to extend your current plan instead.
Review Payment Details
You'll see the total SOL amount due, the deposit wallet address, and a countdown timer. Payments must be completed within the time window shown.
Send SOL Payment
Scan the QR code or copy the deposit address. Send the exact SOL amount from any Solana wallet. The system automatically detects your payment and activates your plan.
Receive Your API Key
Once payment is confirmed, your API key is emailed to you. Use this key to sign into the Dynamix dashboard.
Sign In
Sign in with the API key you received via email after purchasing your plan.
How to Sign In
- Go to dynamix.gg/signin
- Paste your API key into the input field
- Click Sign In
- You'll be redirected to the Dashboard

Dashboard Overview
The Dashboard is your primary control center. It is divided into three main areas:

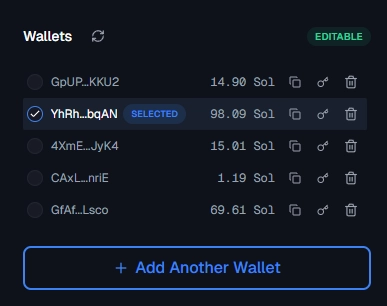
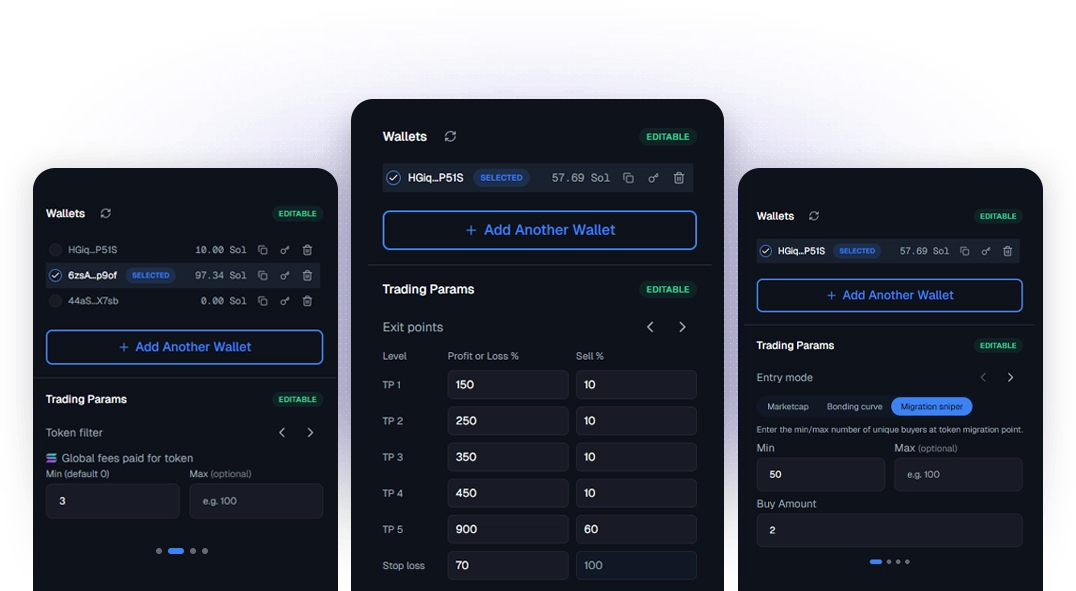
Wallets Panel
Right side. Manage your Solana wallets: generate, import, delete, view balances, and select which wallet the bot uses for trading.
Trading Parameters
Center. Four configuration slides: Entry Mode, Token Filter, Exit Points, and Transaction Settings. This is where you set your strategy.
Activity Overview
Right side. Live trade updates, transaction history table with pagination, connection status, and trading status indicators.
Wallet Management
The Wallets panel lets you manage the Solana wallets used for trading. The selected wallet is the one the bot will use when executing trades.
Generate a New Wallet
- Click the + Add Wallet button below the wallet list
- Select Generate New Wallet in the modal
- A new Solana keypair is created and the public key is displayed
- The private key is encrypted with AWS KMS and stored securely
- Fund the wallet by sending SOL to the displayed address
Import an Existing Wallet
- Click + Add Wallet
- Select Import Wallet
- Paste your base58-encoded private key
- The wallet's public key and current SOL balance are shown
Wallet Actions
| Action | Description |
|---|---|
| Select | Click the radio button next to a wallet to select it for trading |
| Copy Address | Click the copy icon to copy the wallet's public address to clipboard |
| Show Private Key | Click the key icon to reveal and copy the decrypted private key |
| Delete | Click the trash icon to remove the wallet (requires confirmation) |
| Refresh Balances | Click the refresh button in the header to update all wallet balances |
Trading Parameters
Trading parameters are organized into four configuration slides. Navigate between them using the arrow buttons or dot indicators at the bottom of the card.
Entry Mode
How the bot detects when to buy
Token Filter
Which tokens are eligible
Exit Points
When and how much to sell
TX Settings
Fees, slippage, MEV protection
Entry Mode: Market Cap
In Market Cap mode, the bot automatically buys a token when its market cap (measured in SOL) reaches your specified threshold.
How It Works
- Set the Entry Value, the minimum market cap in SOL at which the bot should buy
- Optionally set Entry Value Max to create a range (e.g., buy only when MC is between 50 and 100 SOL)
- Set the Buy Amount, how much SOL to spend per trade
Example Configuration
| Entry Mode | Market Cap |
| Entry Value | 50 SOL |
| Entry Value Max | 100 SOL (optional) |
| Buy Amount | 0.5 SOL per trade |
Entry Mode: Bonding Curve
In Bonding Curve mode, the bot buys when a token's bonding curve progress reaches a specific percentage on PumpFun.
How It Works
- PumpFun tokens have a bonding curve that fills from 0% to 100%
- At 100%, the token migrates to PumpSwap (Raydium AMM)
- Set the Entry Value as a percentage (e.g., buy at 30% curve completion)
- Optionally set Entry Value Max for a range (e.g., 30%–60%)
| Entry Mode | Bonding Curve |
| Entry Value | 30 (= 30%) |
| Buy Amount | 1 SOL |
Entry Mode: Migration Sniper
Migration Sniper mode is Dynamix's most advanced entry strategy. The bot watches for the exact moment a token completes its bonding curve on PumpFun and migrates to PumpSwap, then instantly buys.
How It Works
- The bot detects when a token's bonding curve reaches 100%
- It then monitors for the migration transaction to PumpSwap
- You set a minimum unique buyer count to filter quality tokens
- Optionally set a maximum buyer count to avoid over-hyped tokens
- The bot fires a buy the instant migration occurs if conditions are met
| Entry Mode | Migration Sniper |
| Min Unique Buyers | 50 |
| Max Unique Buyers | 500 (optional) |
| Buy Amount | 0.5 SOL |
Token Filter: Global Fees Paid
The token filter lets you narrow down which tokens the bot is allowed to trade based on global fees paid since the token was created.
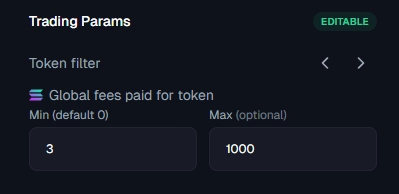
What Are Global Fees Paid?
Global fees paid is the total amount of SOL spent on priority fees, Jito tips, and gas fees across all transactions for a specific token since its creation. High global fees indicate active trading interest, while low fees suggest a dormant or new token.
Configuration
| Field | Description | Default |
|---|---|---|
| Min Global Fees Paid | Only trade tokens where global fees paid exceeds this value (SOL) | 0 SOL |
| Max Global Fees Paid | Skip tokens where global fees exceed this value (optional) | No limit |
Exit Points: Take Profit Levels
Dynamix supports up to 5 take-profit (TP) levels. Each level defines: at what profit percentage to trigger, and what percentage of your token holdings to sell.
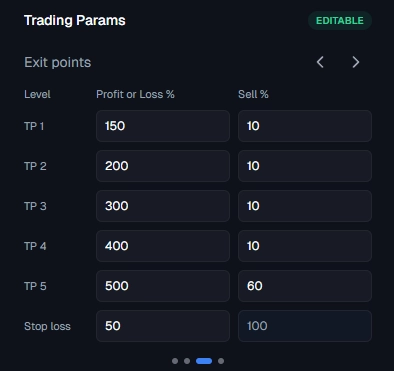
How Take Profit Works
When the token price rises by the specified percentage compared to your average entry price, the bot automatically sells the configured % of your remaining holdings at that level.
Example: 5-Level TP Strategy
| Level | Trigger (Profit %) | Sell % | Meaning |
|---|---|---|---|
| TP 1 | +100% (2x) | 20% | At 2x price, sell 20% of holdings |
| TP 2 | +400% (5x) | 30% | At 5x price, sell 30% of holdings |
| TP 3 | +900% (10x) | 25% | At 10x price, sell 25% of holdings |
| TP 4 | +1900% (20x) | 15% | At 20x price, sell 15% of holdings |
| TP 5 | +4900% (50x) | 10% | At 50x price, sell 10% of holdings |
Exit Points: Stop Loss
The stop loss protects your capital by automatically exiting your entire position if the token price drops below your threshold.
How Stop Loss Works
- Set the loss percentage relative to your average buy price
- When the price drops by this percentage, the bot sells 100% of your holdings
- The sell percentage is fixed at 100% and cannot be changed
Example
| Average Buy Price | 0.001 SOL per token |
| Stop Loss | -30% |
| Trigger Price | 0.0007 SOL per token |
| Action | Sell 100% of holdings |
Transaction Settings: Slippage
Slippage is the maximum acceptable difference between the expected and actual price of a trade.
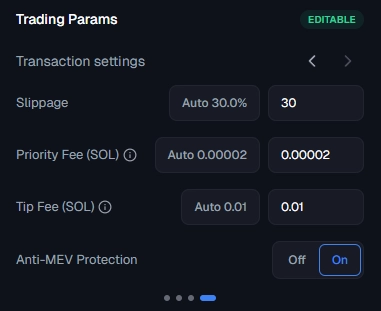
Setting Slippage
- Auto, Uses the recommended slippage percentage
- Custom, Enter your own value (e.g., 30 = 30%)
What the Value Means
If you set slippage to 30%, and the current token price would give you 1000 tokens for 1 SOL, the transaction will still execute if you receive as few as 700 tokens. If the price moves beyond 30%, the transaction fails and no trade is made.
Transaction Settings: Priority Fee
The priority fee is an extra fee paid to Solana validators to prioritize your transaction in the next block.
Configuration
- Auto, Uses the current network rate
- Custom, Set your own fee in SOL
Higher priority fees increase the chance your transaction lands quickly, which is critical for sniping newly migrated tokens. The default is approximately 0.00002 SOL.
Transaction Settings: Tip Fee (Jito)
The tip fee is a payment to Jito block builders that routes your transaction through a private mempool for faster inclusion and MEV protection.
Configuration
- Auto, Uses the default tip amount (0.01 SOL)
- Custom, Set your own tip in SOL
The tip fee works alongside the priority fee. While priority fee incentivizes validators, the tip fee incentivizes Jito block builders for preferential block inclusion.
Transaction Settings: Anti-MEV Protection
MEV (Maximal Extractable Value) attacks, such as sandwich attacks, can cause you to receive a worse price on your trades. Anti-MEV protection prevents this.
How It Works
- Off (default), Transactions go through the public Solana mempool
- On, Transactions are routed through Jito's private mempool
When enabled, your buy and sell transactions are invisible to front-running bots until they're included in a block. This means sandwich bots cannot see your pending trade and exploit it.
What Is a Sandwich Attack?
A sandwich bot sees your pending buy, places a buy before you (raising the price), then sells after your trade executes. You end up paying more, and the bot profits from the difference. Anti-MEV prevents this entirely.
Live Trade Updates
Dynamix streams real-time trade notifications directly to your browser via Server-Sent Events (SSE). Every buy and sell the bot executes appears instantly.
Status Indicators
SSE Connection Status
- Live, Connected, receiving updates (green pulse indicator)
- Connecting, Establishing connection (amber indicator)
Trading Status
- Running, Bot is actively monitoring and trading
- Stopped, Bot is paused, no trades will execute
Toast Notifications
When a trade executes, a toast notification appears at the top of the screen showing:
- Wallet address that executed the trade (shortened)
- Action: Bought or Sold
- Token amount and symbol
- SOL value of the trade
- Token icon or default avatar
Transaction History
The Activity Overview panel shows a complete log of all executed trades with full details and pagination.
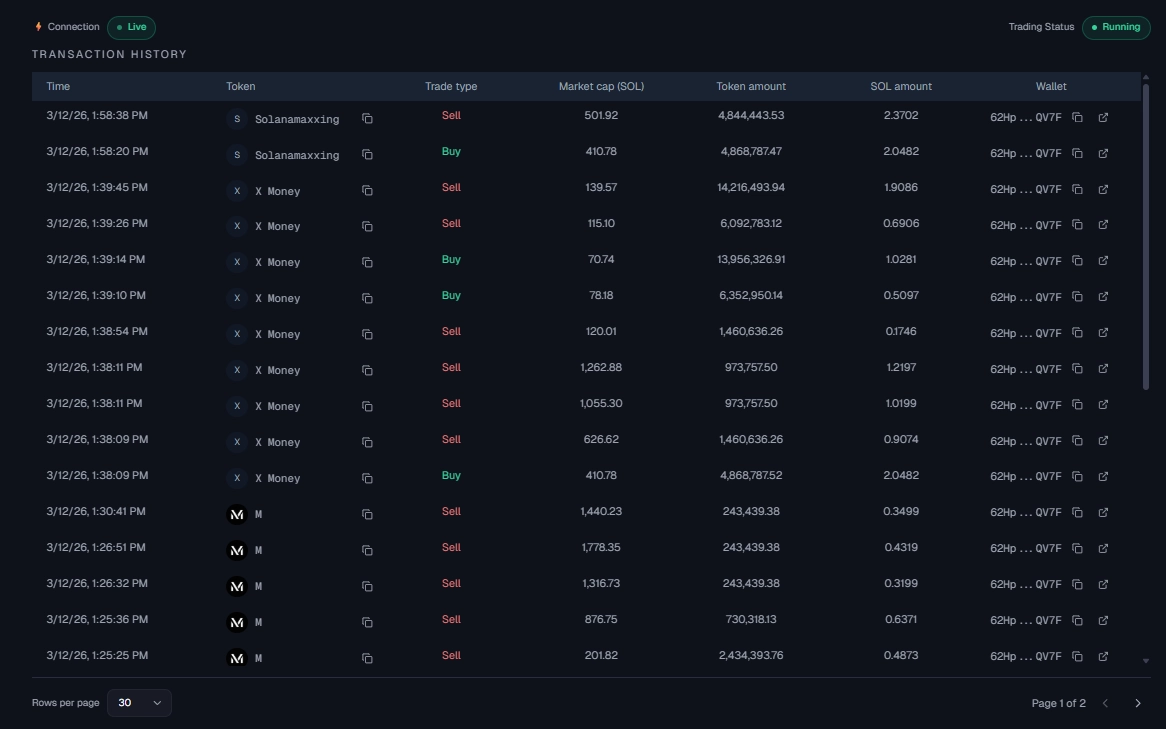
Table Columns
| Column | Description |
|---|---|
| Time | Date and time the trade was executed |
| Token | Token icon, symbol, and name. Click the copy button to copy the token mint address. |
| Trade Type | Buy or Sell, color-coded for quick identification |
| Market Cap (SOL) | Token market cap at the time of the trade |
| Token Amount | How many tokens were bought or sold |
| SOL Amount | SOL value of the trade |
| Wallet | The wallet that executed the trade (shortened). Click to copy full address. |
Pagination
Use the pagination controls at the bottom of the table:
- Rows per page, Choose 20, 30, or 50 trades per page
- Previous / Next, Navigate between pages
- Page indicator shows your current position (e.g., "Page 1 of 5")
API Key Management
Your API key is your identity on Dynamix. Manage it from the Settings page, accessible via the top navigation bar.
What You'll See
- API Key, Blurred by default for security. Click the eye icon to reveal.
- Copy Button, Copy your API key to clipboard
- Expiration Date, When your plan expires
- Days Remaining, Countdown to expiration
- Status, Active (green) or Inactive (red)
Rotate API Key
If you suspect your API key has been compromised, you can rotate it:
- Click Rotate API Key on the Settings page
- A new key is generated and the old one is immediately invalidated
- The new key is emailed to your registered email address
- You'll need to sign in again with the new key
Extend Your Plan
You can extend your plan at any time before or after it expires.
How to Extend
Go to Settings
Navigate to the Settings page from the top navigation bar.
Click Extend Plan
You'll be redirected to the purchase flow with your email pre-filled.
Choose Duration & Pay
Select monthly or yearly extension. The additional time is added to your existing expiration date.
Full Dashboard Reference
Here's a comprehensive view of all dashboard components working together.
The dashboard is divided into four dedicated configuration panels, Entry Mode, Token Filter, Exit Points, and Transaction Settings, all editable in real time. Use the navigation arrows or dot indicators to switch between panels.
Starting a Trade Session
- Select your wallet
- Choose an entry mode and set values
- Configure token filters (optional)
- Set take profit and stop loss levels
- Adjust transaction settings or use defaults
- Click Start
Stopping a Trade Session
- Click Stop in the trading parameters
- The bot stops monitoring new tokens
- Open positions continue to be managed by existing exit rules
- Wallet and parameter fields unlock for editing
Signing Out
When you click the Exit button in the navigation bar, Dynamix checks if the bot is currently running.
Keep Running
Sign out but leave the bot running. It will continue executing trades based on your current configuration, even while you're logged out.
Stop & Sign Out
Stop the bot completely and sign out. No new trades will be executed until you sign back in and restart.